Friday, April 2, 2021

IP Address vs Physical Address IPv6 IPV4 Router Classes of IP Address, Subnetting, NAT, Router, Switch, DHCP, CIDR


Physical Address (MAC Address) - Local Scope - 
Its like saying I live at home

Logical Address (IP Address) - IPv4   and IPv6
Its like saying I live at 155, Colonel Colony

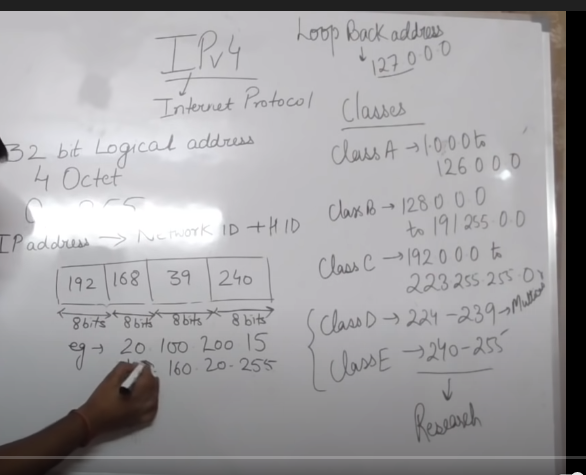
IPv4 is 32 bit (4 Octet) Logical Address
0 to 255 , 4 Octets

IPv4 has 5 Classes Adresses

Class A - N H H H (1st Octet - reserved for Network ID)
Class B - N N H H (First Two Octets - reserved for Network ID)
Class C - N N N H (First Three Octets - reserved for Network ID)
Class D - Networking
Class E - Research


Network ID  

Loopback Address

Network Id - 
Multicast Address

ClassAddress range
Class A1.0.0.1 to 126.255.255.254
Class B128.1.0.1 to 191.255.255.254
Class C192.0.1.1 to 223.255.254.254
Class D224.0.0.0 to 239.255.255.255

176.10.0.0 - Purchased This Network ID 
This is class B
Network ID    - 176.10.0.0
Host Part - Give it 255 - It becomes Broadcast ID
Broadcast ID  - 176.10.255.255

No.of Usable IP Addresses
256*256 = 65536 - 2 = Usable ID  65534
2 IP Address deducted for - Network Id and Broadcast ID


Efficiently using IP Address - Use Subnetting
or Use IPv6

Subnetting - Logical Division of Network

Router Has Multiple Interfaces
Router is not a "Networking device" - its a "Inter-Networking" Device
Class A - Wastes Host Part  256*256*256 =  16777216 -2 = 16777214 
How do we solve it  ?
Use Subnets ?


https://www.youtube.com/watch?v=_ISu9f8ofZk


CIDR Notation means Network Ratio


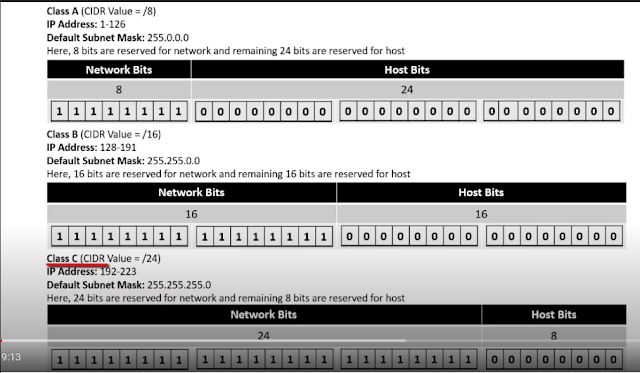
Class A   1 to 126  - N H H H
Class B   128 to 191 - N N H H
Class C    192 to 223 - N N N H

Class A /8
Class B/16
Class C/24

Private Addresses

A - 10.0.0.0        -  10.255.255.255   - 10.x.x.x  - 1 Network 
B - 172.16.0.0       -  172.31. 255.255   - 172.16.x.x -> 172.31.x.x -16 Networks
C - 192.168.0.0     - 192.168.255.255  - 192.168.x.x 255 Networks

2 Different IP Addresses : Public and Private
~4 Billion Public IP Addresses 

Router can act as switch - No Internet Connection necessary

IANA  -  Private IP Address 
Not Routable
Not Connected to Internet


NAT  - Network Address Translation

IPv4 + NAT 
NAT Converts Private to Public & Public to Private

Ipv6 does not need Private Address and NAT
IPv6 - Every Single Device will have its own 
340  Undecillion  Ip Address
340 -- 36 Digits after it


CIDR - Classless Inter-Domain Routing - Number of Network Bits


192.168.10.0/28 =  16 Subnets having 14 Host each

Subnet Mask  = 255.255.255.240
Default Subnet Mask = 255.255.255.0
255.255.255.   128 64 32 16 8 4 2 1
128+64+32+16 = 240

No Of N/w = 2 ^ Bits borrowed from host (28-24 =4)
2^4 = 16 networks

No of Hosts = 2^4 = 16 -2 = 14 ( 2 Reserved for Network Address/Broadcast Address)

16 * 16 = 16 different Subnets(Networks) of 14 Host each


Thursday, April 1, 2021

AWS Route 53 - DNS, Elastic Load Balancer, Name Server, Domain Registrar, Hosted Zone, A Record, C Record

Why is Route 53 So called ?
TCP/UDP protocol have a default port 53 for DNS Queries
-------------------------------------------------------
Domain Registrar
DNS 
Health Monitoring
-------------------------------------------------------
 Networking & Content Delivery -> Route 53
-------------------------------------------------------
Register a Domain Name ?

Root Level Domain -> .com, .org, .edu. .net
Geographic Level Domain -> .co.in, .co.in

Domain Registrar -> Domain Name Purchased from 
GoDaddy is an example.

"Route 53" is also a Domain Registrar

https://www.iana.org/ - For IP Addresses

Top Level Domain - Root Name Server

"Route 53" is Name Server

Domain Registrar knows which same Set of "Name Servers" your domain points to
Remove current NS and Update NS. It takes max 24 hours before these changes are effective


Who operates them? ROOT NAME Servers

The root servers are operated by 12 different organizations:

  • A VeriSign Global Registry Services
  • B University of Southern California, Information Sciences Institute
  • C Cogent Communications
  • D University of Maryland
  • E NASA Ames Research Center
  • F Internet Systems Consortium, Inc.
  • G US DoD Network Information Center
  • H US Army Research Lab
  • I Netnod
  • J VeriSign Global Registry Services
  • K RIPE NCC
  • L ICANN
  • M WIDE Project

Many of these organizations have been operating root servers since the creation of the DNS. The list shows the Internet’s early roots as a US-based research and military network.


----------------------------------------------------------------------------------------------

Route 53 Has Hosted Zone
If You have external Domain Registrar(Go Daddy) - You need a create a Hosted Zone 
You need to configure - AWS Provided Name Server in External Registrar Website.

If you have Route 53 as Domain Registrar, Hosted Zone is created by default

AWS Route 53 can have  500 Hosted Zones by default and 10,000 Record Resource Sets 

Connect Domain Name with Route 53 Hosted Zone - This is called Delegation


If You migrate Domain across Registrar, it usually takes around 48 Hours because DNS Systems cache it for 48 Hours

AWS Supports 2 Types of Domains - Generic TLD(.com, .net/Geographic TLD
If AWS does not contains that domain, You cannot transfer then it to AWS

You need Authorization Code from Existing Domain Registrar


Start of Authority, Hosted Zone

Route 53 - "Hosted Zone" - is a collection of records for Specific domain

Hosted Zone is a container which holds information about how you want to route traffic for domain and its sub domains.

www.techguftgu.com - Subdomains of techguftgu.com
info.techguftgu.com - techguftgu.com
support.techguftgu.com - techguftgu.com

Public Hosted Zone
Private Hosted Zone - Only works within VPC

When You create new Hosted Zone, It creates "Name Server" Record
and "Start of Authority" Record
SOA - Start of Authority
4 NameServers - Unique in 1 Hosted Zone

Do Not Change Name Servers Record

.com - Generic TLD
.net -  Generic TLD
.org -  Generic TLD
.in/.uk - Geographical

Unique Set of  4 TLD Name servers collectively known as - "Delegation Set"

"Route 53" - Acts as "Authoritative Servers"

ns-1234.awsdns-39.com - Example of 
ns-3678.awsdns-12.org
ns-2947.awsdns-39.net

Its possible to have Hosted Zone having same Names
But they will have different Records/Different Name Servers
When You register, name Servers will be updated with "External Domain Registrar"

-------------------------------------------------------------------------------------------------
nslookup 

Put above command name in cmd prompt

Enter IP , Get FQDN
Enter FQDN, Get IP address

mail.google.com
docs.aws.amazon.com
-------------------------------------------------------------------------------------------------
Some Registrar allow you to specify IP Adress
Some Registrar allow you to specify FQDN - Fully Qualified Domain Name

-------------------------------------------------------------------------------------------------
You can Transfer Domain from 1 AWS Account to Another 
For this drop a  mail to Support Team @ AWS

You cannot Transfer "Hosted Zone" from 1 AWS Account to another

You can have Domain in 1 AWS Account and Hosted Zone in another Aws Account

--------------------------------------------------------------------------------------------------

Types of Records in "Hosted Zone"

  • A Record -> Domain Name to IPv4 Address -> 32 Bits
  • AAAA Record -> DNS Name to IPv6 Address -> 128 Bits -> Quad Ipv4
  • C Record -> Canonical Name - Alias of Domain
  • NS Record ->  NameServer Record -> 4 Nameserver for 4 TLD Domains - ORG, NET, COM, Geographical (.in, .uk) (Authoritative Name Server)
  • SOA Record -> Start of Authority - Meta Info about DNS Hosted Zone 
  • MX Record -> Mail Server Record

NS Record - > 4 Nameservers which we need to update in - Domain Registrar
4 Name Server for each of Top level domains 

CName - Cannot be made for "Root Domain" - Zone Apex
techguftgu.com ---- CNAME X
techguftgu.com ---- subdomain.techguftgu.com ---> CNAME - Yes


SOA Record -> "Hosted Zone" can have only 1 SOA Record
Email from domain of Owner 
Authoritative Server 
Name of Owner
Serial Number  - No of Times You have incremented 


Create EC2 Instance Steps - High Level Overview

 1. Choose AMI
2. Choose Instance Type
3. Configure Instance
4. Add Storage
5. Add Tags
6. Configure Security Group
7. Review
PEM = Private Key
Generate Password and Administrator - RDP Protocol (mstsc)

EBS Volumes, AWS

 "Choose Storage"
EBS Volume Pros
Production Workloads
Highly Available - Automatically Replicated within a single Availability Zone to protect against H/W Failures
Scalable - Dynamically Upgrade Size of Volume
You can attach an available EBS volume to one or more of your instances that is in the same Availability Zone as the volume.
Storage Service Applications
BLOCK : EBS (Byte Level) - Transfers Data Fixed Size Block - Byte Level Interaction 
FILE : EFS (File Level) - File System Level Interaction with Disk
OBJECT : S3 (Object Level) / Glacier
3 Specific Block Store Offering
Instance Store  - Epheremal / Attached to Instance Host - No N/w Roundtrip - Physical Store - 1 Disk - Physical Disks Which are Local to Instances where EC2 is hosted.- Not replicated, No Snapshot
EBS - Persistent - Network Disk/Volume - Storage Volumes(Disk) attached to EC2 -Logical Store - Not real Piece of Disk (Its scattered across Many Disks)
EBS SDD
EBS HDD

Attach and Detach - Volume
Many Volumes are attached to Single Instance
AZ will be same - Replicated, Attach in same Instances in Same AZ

99.999%
0.1 to 0.2% AFR - Annual Failure Rate
We may loose 1/2 Out of 1000
So, We need to have Snapshot Service

Snapshot Service hosted on S3 which is Regional Service - Not specific to AZ
and has 99.9999999 Availability
For GP2 Instances,
 The gp2 storage type also has a base IOPS that is set when the volume is created. However, you don’t provide a value for the IOPS directly—instead, IOPS is a function of the size of the volume. The IOPS for a gp2 volume is the size of the volume in GiB x 3, with a minimum of 100 IOPS and a maximum of 16K IOPS( Max was 10K IOPS Earlier)
 How does this work? 
The gp2 volumes have a characteristic called burst mode.
To understand burst mode, you must be aware that every gp2 volume regardless of size starts with 5.4 million I/O credits at 3000 IOPS.
Well, as stated earlier, the gp2 volumes start with I/O credit that, if fully used, works out to 3000 IOPS for 30 minutes. 
The burst credit is always being replenished at the rate of 3 IOPS per GiB per second. 
Consider a daily ETL workload that uses a lot of I/O. For the daily job, gp2 can burst, and during downtime, burst credit can be replenished for the next day’s run.
Volume Type : General Purpose SSD (gp2)
Size (GiB) :33 (Min: 1 GiB, Max: 16384 GiB) 
IOPS : 100 / 3000
(Baseline of 3 IOPS per GiB with a minimum of 100 IOPS, burstable to 3000 IOPS)
Size (GiB) :34 (Min: 1 GiB, Max: 16384 GiB) 
IOPS : 102 / 3000
34 *2 = 102 Above Minimum Baseline
Burst is 3000 - > So , 3 * 1000 GB (1 TB) will have a minimum of 3000 So Burst does not Matter
Burst works on Concept of Credits - Max 5.4 Million IOPS
Burst is relevant for Smaller EBS having size < 1000 GiB (~1 TiB)
Kibibyte (KiB) 1024¹ = 1,024
Mebibyte (MiB) 1024² = 1,048,576
Gibibyte (GiB) 1024³ = 1,073,741,824
Tebibyte (TiB) 1024⁴ = 1,099,511,627,776
Pebibyte (PiB) 1024⁵ = 1,125,899,906,842,624
https://www.youtube.com/watch?v=1AHmTmCkdp8
https://docs.ukcloud.com/articles/other/other-ref-gib.html
https://aws.amazon.com/blogs/database/understanding-burst-vs-baseline-performance-with-amazon-rds-and-gp2
https://docs.aws.amazon.com/AWSEC2/latest/UserGuide/ebs-volume-types.html
EBS Volume Types :
    General Purpose SSD (GP2)
3 IOPS/16000 IOPS
Not for Latency Sensitive Applications
Moderately Expensive
Provisioned IOPS SSD (IO1)
50 IOPS Per GB
64,000 IOPS per Volume
99.9 % Durability
Most Expensive
Provisioned IOPS SSD (IO2) - New Version
500 IOPS Per GB
64,000 IOPS per Volume
Durability - 99.999 %
Same Price as IO1 but Durability is high as compared to IO1


Throughput Optimised  HDD (ST1)
Big Data , Warehouse 
Loads of Data and Needs to be accessed Frequently
Cannot be a Root Volume
500 MB per second per Volume

Lowest Cost - Cold HDD (Lots of Data , Slower)(SC1)
Cannot be a Root Volume
250 MB Per second per Volume

Burst  vs Baseline
Throughput - Size of Data - Number of bits to be read/written in 1 sec 
IOPS - Number of Read and Written Per second 

Elastic Load Balancer , AWS,Healthy Threshold,UnHealthy Threshold, Response Timeout,Health Check Interval,Ping, ELB


 7. Application Layer
6. Presentation Layer
5. Session Layer
4. Transport Layer - TCP/UDP
3. Network Layer   - Routing Packets based on IP Address
2. Data Link Layer
1. Physical Layer

OSI Reference Model

--------------------------------------------------------------------

  • Application Load Balancer - Based on HTTP Header
      •  Allows You to route requests on the basis of HTTP Request 
  • N/W Load Balancer - Very Expensive/High Performance - Operates at Transport Layer (Layer 4)
  • Classic Load Balancer - Supports Layer7(HTTP(s)/Layer 4 (Legacy)

--------------------------------------------------------------------

Load Balancer Algorithm

  1. Round-Robin
  2. Least Loaded Server

"X-Forwarded-For" Header  - Tells us about Originating IP

Common LB Error - HTTP 504 
LB Could not connect to Target Server/Database 

7. Application Layer|
6. Presentation Layer|
5. Session Layer|
4. Transport Layer - TCP/UDP|
3. Network Layer   - Routing Packets based on IP Address|
2. Data Link Layer|
1. Physical Layer|

OSI Reference Model|
https://www.howtogeek.com/367129/what-is-a-504-gateway-timeout-error-and-how-can-i-fix-it/
--------------------------------------------------------------------
Application Load Balancer - Based on HTTP Header|
Allows You to route requests on the basis of HTTP Request |

N/W Load Balancer - Very Expensive/High Performance - Operates at Transport Layer (Layer 4)|
Not at Network layer, At Transport layer
Classic Load Balancer - Supports Layer7(HTTP(s)/Layer 4 (Legacy)|
--------------------------------------------------------------------

Load Balancer Algorithm|

Round-Robin|
Least Loaded Server|
"X-Forwarded-For" Header  - Tells us about Originating IP|

Common LB Error - HTTP 504 |
LB Could not connect to Target Server/Database DNS - Elastic Load Balancer - Route 53|

--------------------------------------------------------------------------------------------
--------------------------------------------------------------------------------------------
ELB is Region Specific - 1 Region = 1 ELB

VPC 

ELB is not concerned with "Outbound" Traffic
ELB only concerned with inbound Traffic and can be redirected to registered EC2 Instances
ELB is charged Hourly

If You delete ELB, Then Configure "Route 53" to somewhere else.

Listener listens to  incoming Connection Requests
FrontEnd Listener - Virtual 
BackEnd Listener - Virtual

FrontEnd Listener - Checks for Traffic from Internet to ELB
Backend Listener - Checks for Traffic from ELB to Instances based on port/protocol

ELB Will direct traffic to primary IP address /eth0

ELB - Works only in IPv4
IPv6 is not supported currently

Subnet 
AZ
VPC

ICMP Protocol - "Ping" Application 
RDP - MSTSC - 3389 port
HTTP -80
HTTPs - 443


Load Balancer is tied to VPC
Load Balancer -> only directs Traffic Its meant for - Protocol its enabled for
Usually EC2 Don't have Public IP 
Internally They Connect via Private IP


Load Balancer  has 3 Imp Components
Listener => Target Group (Health Check) => Target

Listener -> Which Protocol it wants to go
Target Grp -> Grp of EC2 Instances
Health Check - Every Target Group has Health Check -  Hearbeat , If a Node is down - It updates LB regarding this
Target ->  can be  -> IP, Lambdas, EC2
Targets are across Availability Zones

Internet Facing Elastic Load Balancer - Public DNS Name 

DNS Route 53 -> Elastic Load Balancer[ELB] -> EC2 
----------------------------------------------------------------------------------------------------

193.1.4.0/27  = 32-27 = 5
2^5 = 32 Instances
32 - 5 (AWS Resrved) = 27 
27 -8 =19 (8 is kept for Load Balancer) - 

If increase load on ELB, ELB can allocate IPs to ELB Nodes - 8 Nodes of ELB


192.168.10.0/27  - For Network Address 
192.168.10.1/27   - VPC Router
192.168.10.2/27   - VPC DNS Server
192.168.10.3/27   - Unknown /Future Use
192.168.10.31/27  - VPC Netcast


5 Reserved
27 Remaining
ELB - 8 Reserve
Total 19 IP Addresses
Minimum 2 AZ in VPC needs to be connected to ELB -Elastic Load Balancer
LB -> Distributes Load across Availability Zones
Keep Same number of EC2 Instances in all Availability Zones
Load Balancer Keeps track on Health of Instances

Registered Instances has default time period 5 seconds - "Response Timeout"

"Health Check Interval" - 30 Sec - Default (Time between 2 Seconds)
You can set to 5 -300 sec

"UnHealthy Threshold" - Number of Consecutive Failed Health Checks = Default 2
Range 2-10

"Healthy Threshold" - Number of Consecutive Sucessful Health Checks = Default 10
Range 2-10

Healthy/UnHealthy  Instances
Load Balancer monitors health of its registered Instance

Cross-zone load balancing
The nodes for your load balancer distribute requests from clients to registered targets. When cross-zone load balancing is enabled, each load balancer node distributes traffic across the registered targets in all enabled Availability Zones. When cross-zone load balancing is disabled, each load balancer node distributes traffic only across the registered targets in its Availability Zone.
Cross-zone load balancing reduces the need to maintain equivalent numbers of instances in each enabled Availability Zone, and improves your application's ability to handle the loss of one or more instances. However, we still recommend that you maintain approximately equivalent numbers of instances in each enabled Availability Zone for higher fault tolerance.

PING
Ping uses the ICMP protocol to check the network reachability of the device you are checking. This works at a low level and tells you that the device is there and has power to the network interface. Just because something responds to a ping request, it is not a true indication that the service on the device is running but it does help in troubleshooting

HTTP Monitor
The monitor work by looking at the HTTP Response Code for the configured page. If a page exists, the web server will return a status code of 200, which means OK. This is a simple check to ascertain if a page exists on a website.


ELB is region specific - 1 ELB can work with multiple Availability Zones within same region.


ELB can be internal or internet facing

ELB is accessed via DNS Name

ELB 


FSTAB , Linux


The /etc/fstab File

So far, we’ve seen several examples of the mount command to attach to various filesystems. However, the mounts won’t survive after a reboot.

For some filesystems, we may want to have them automatically mounted after system boot or reboot. The /etc/fstab file can help us to achieve this.


FSTAB File, You have to edit using Vi or VIM editor and enter 6 Fields separated by space and then save it

Make sure You take a back up of current/original FSTAB file


Table structure

The table itself is a 6 column structure, where each column designates a specific parameter and must be set up in the correct order. The columns of the table are as follows from left to right: 

  • Device: usually the given name or UUID of the mounted device (sda1/sda2/etc).
  • Mount Point: designates the directory where the device is/will be mounted. 
  • File System Type: nothing trick here, shows the type of filesystem in use. 
  • Options: lists any active mount options. If using multiple options they must be separated by commas. 
  • Backup Operation: (the first digit) this is a binary system where 1 = dump utility backup of a partition. 0 = no backup. This is an outdated backup method and should NOT be used. 
  • File System Check Order: (second digit) Here we can see three possible outcomes.  0 means that fsck will not check the filesystem. Numbers higher than this represent the check order. The root filesystem should be set to 1 and other partitions set to 2

[root@ip-172-31-58-120 ec2-user]# blkid
/dev/xvda1: LABEL="/" UUID="74fc4c15-c86f-4c31-92f6-0df873546b85" TYPE="xfs" PARTLABEL="Linux" PARTUUID="ed868158-eb4b-43a5-8ed5-8b58aa998193"
/dev/xvdf: UUID="2008-11-19-03-48-46-00" LABEL="CDROM" TYPE="iso9660" PTUUID="4971ec01" PTTYPE="dos"

[root@ip-172-31-58-120 ec2-user]# lsblk -f
NAME  FSTYPE  LABEL UUID                                 MOUNTPOINT
xvda
xvda1 xfs     /     74fc4c15-c86f-4c31-92f6-0df873546b85 /
xvdf  iso9660 CDROM 2008-11-19-03-48-46-00               /media/census

[root@ip-172-31-58-120 census]# cat /etc/fstab
UUID=74fc4c15-c86f-4c31-92f6-0df873546b85    /            xfs     defaults,noatime  1   1
UUID=2008-11-19-03-48-46-00                 /media/census iso9660 defaults 0 0


Attach Disk, Format File System, Mount Disk - Linux Machine


3 Steps to Add Disk to Linux System
  •  Attach  (Via AWS Management Console)
  • Format (Add FileSystem/Format Disk/Format Volume)
  • Mount (Make new Disk available under a name)
  • Automatic Mount after Reboot - Edit "/etc/fstab" File
----------------------------------------------------------------------------------------------------------------
  • Find list of all devices attached to  System
      • lsblk -fa
      • du -h
  • Find out which device is unMounted - Device not having Mount Path 
  • FInd out if that Unmounted(Only Attached, Not Mounted) Device is  Blank or has Data within it.
      • sudo file -s /dev/xvdf 
  • Attached Disk can be readonly like a Bootable CD or It can be blank 
  • If The Attached Disk is having no data/raw/blank - Format it and add Filesystem to it , 
  • If the output shows simply data, as in the following example output, there is no file system on the device
  • Use "mkfs" command to create a Filesystem or Format a disk
      •  sudo mkfs -t xfs /dev/xvdf
  • Mount the Disk using below command,   mount <Device_Name> <Mount_Path>
      • sudo mount /dev/xvdf /data
  • Once we mount disk on a label, We need to edit "/etc/fstab" file to make sure that When we reboot System, We can mount these disks automatically under specified names
      • vi /etc/fstab
  • Find out <DEVICE_ID> using "blkid" 
      • blkid
--------------------------------------------------------------------------------------------------------------------------
3.4. NFS

NFS (Network File System) is a distributed filesystem protocol that allows us to share remote directories over a network.

To mount an NFS share, we must install the NFS client package first.

Let’s say we have a well-configured NFS shared directory “/export/nfs/shared” on a server 192.168.0.8.

Similar to the Samba share mount, we first create the mount point and then mount the NFS share:

root# mkdir /mnt/nfsShare
root# mount -t nfs 192.168.0.8:/export/nfs/shared /mnt/nfsShare

root# mount | grep nfsShare
192.168.0.8:/export/nfs/shared/ on /mnt/nfsShare type nfs (rw,addr=192.168.0.8)

3.5. Commonly Used mount -o Option

The mount command supports many options.

Some commonly used options are:

  • loop – mount as a loop device
  • rw – mount the filesystem read-write (default)
  • ro – mount the filesystem read-only
  • iocharset=value – character to use for accessing the filesystem (default iso8859-1)
  • noauto – the filesystem will not be mounted automatically during system boot

3.6. The /etc/fstab FileSo far, we’ve seen several examples of the mount command to attach to various filesystems. However, the mounts won’t survive after a reboot.

For some filesystems, we may want to have them automatically mounted after system boot or reboot. The /etc/fstab file can help us to achieve this.The /etc/fstab file contains lines describing which filesystems or devices are to be mounted on which mount points, and with which mount options.

All filesystems listed in the fstab file will be mounted automatically during system boot, except for the lines containing the “noauto” mount option.

Let’s see an /etc/fstab example:

$ cat /etc/fstab
# <file system> <mount point>   <type>  <options>       <dump>  <pass>
/dev/sdb1	/	ext4	rw,defaults,noatime,commit=120,data=ordered	0	1
/dev/sdb2	/home	ext4	rw,defaults,noatime,data=ordered	0	2
/dev/sda3	/media/Backup	ntfs-3g	defaults,locale=en_US.UTF-8	0	0
/dev/sda2	/media/Data	ntfs-3g	defaults,locale=en_US.UTF-8	0	0
...

Thus, if we add the following line in this file, the archLinux.iso image will be automatically mounted on /mnt/archIso after system boot:

/media/Data/archLinux.iso /mnt/archIso udf ro,relatime,utf8 0 0

Once a filesystem is mentioned in /etc/fstab, we can mount it by just giving the mount point or the device.

For instance, with the above fstab configuration, we can mount the /dev/sda2 partition with either of the two short commands:

root# mount /media/Data

or

root# mount /dev/sda2

4. Unmounting a Filesystem

The umount command notifies the system to detach the given mounted filesystems. We just provide the filesystem name or the mount point following the umount command.

For example, if we want to unmount the previously mounted USB stick and ISO image:

root# umount /dev/sdd1
root# umount /mnt/archIso

We can also umount multiple mounted filesystems in one shot:

root# umount /dev/sdd1 /mnt/archIso

4.1. Lazy UnmountWhen we want to umount a filesystem, we don’t always know if there are operations still running on it. For instance, a copy job could be running on the filesystem.

Of course, we don’t want to break the copy and get inconsistent data. The option -l will let us do a “lazy” umount.

The -l option informs the system to complete pending read or write operations on that filesystem and then safely unmount it:

root# umount -l mount_point

4.2. Force UnmountIf we pass -f option to the command umount, it’ll forcefully unmount a filesystem even if it’s still busy:

root# umount -f mount_point

We should be careful while executing umount with -f as it could lead to corrupt or inconsistent data in the unmounted filesystem.

One real-world use case for force unmounting could be unmounting a network share because of a connection problem.

-------------------------------------------------------------------------------------

[root@ip-172-31-58-120 ec2-user]# blkid
/dev/xvda1: LABEL="/" UUID="74fc4c15-c86f-4c31-92f6-0df873546b85" TYPE="xfs" PARTLABEL="Linux" PARTUUID="ed868158-eb4b-43a5-8ed5-8b58aa998193"
/dev/xvdf: UUID="2008-11-19-03-48-46-00" LABEL="CDROM" TYPE="iso9660" PTUUID="4971ec01" PTTYPE="dos"

[root@ip-172-31-58-120 ec2-user]# lsblk -f
NAME  FSTYPE  LABEL UUID                                 MOUNTPOINT
xvda
xvda1 xfs     /     74fc4c15-c86f-4c31-92f6-0df873546b85 /
xvdf  iso9660 CDROM 2008-11-19-03-48-46-00               /media/census

[root@ip-172-31-58-120 census]# cat /etc/fstab
UUID=74fc4c15-c86f-4c31-92f6-0df873546b85    /            xfs     defaults,noatime  1   1
UUID=2008-11-19-03-48-46-00                 /media/census iso9660 defaults 0 0

Azure - Pipeline - Add Approver for Stage

https://learn.microsoft.com/en-us/azure/devops/pipelines/process/approvals?view=azure-devops&tabs=check-pass